


Step-by-Step Guide to Clean Stubborn Burnt-on Residues
Posted on 07/06/2025
Step-by-Step Guide to Clean Stubborn Burnt-on Residues
Burnt-on residues can be one of the most challenging messes in any kitchen. Whether it's a scorched pan, a stubborn stovetop stain, or baked-on food on your oven racks, these sticky, blackened spots often resist ordinary cleaning methods. However, with a strategic approach, the right products, and a dash of patience, you can restore your cookware and appliances to their sparkling glory.
Understanding Burnt-on Residues
To effectively remove tough burnt-on residues, it's helpful to know why they're so challenging. Burnt food bonds tightly to surfaces under high heat. Often, it caramelizes, causing sugars and proteins to form a hard, crusty layer that's extremely resistant to simple washing. This is why scrubbing with just soap and water typically isn't enough to clean burnt-on food stains.
Preparing to Tackle Stubborn Burnt-on Spots
Before jumping into the cleaning process, set yourself up for success:
- Patience: Some residues take time and persistence to loosen.
- Ventilation: Open windows and turn on fans if using strong cleaning agents.
- Safety: Wear gloves and, for heavy-duty solutions, protective eyewear.
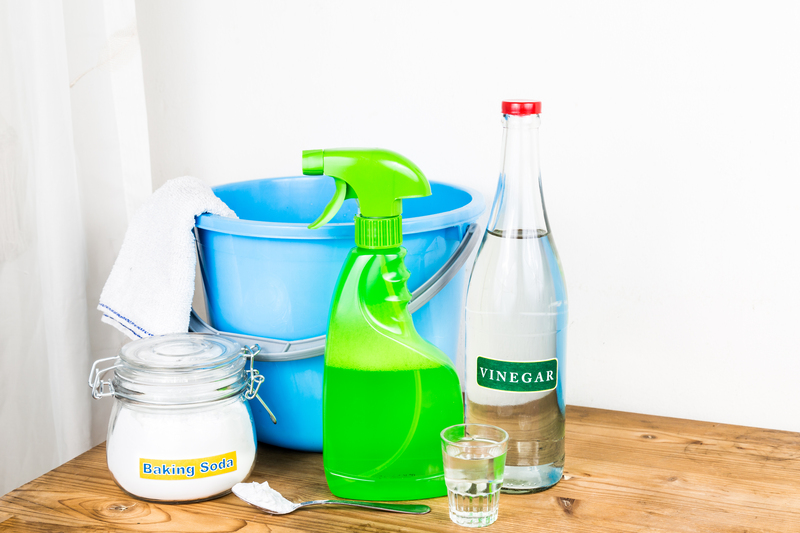
- Right tools: Gather non-abrasive scrubbers, soft brushes, plastic or wooden spatulas, sponges, baking soda, vinegar, dish soap, and any specialty cleaners.
Step 1: Assess the Burnt Area
Examine your cookware or appliance. Burnt-on residue can range from a thin film to a thick, charcoal-like crust. Heavier build-ups may require pre-soaking, while lighter ones may be scrubbed off with minimum effort.
Types of Surfaces Commonly Affected
- Stainless steel pans
- Non-stick skillets
- Ceramic stovetops
- Glass baking dishes
- Oven racks and interiors
Identifying your surface type is crucial because some aggressive cleaning methods can cause scratches or remove protective coatings. Always consult the manufacturer's care instructions first.
Step 2: Pre-Soak for Easier Cleaning
For most stuck-on burnt residues, soaking is the first and often most important step:
How to Pre-Soak Burnt Cookware and Surfaces
- Fill the item with hot water. If you're dealing with a pan or dish, fill it with enough hot water to cover the scorched area.
- Add dishwashing liquid or baking soda. For extra soaking power, mix in a couple of tablespoons of dish soap or 1-2 tablespoons of baking soda.
- Let it soak. The longer you leave it, the better--ideally 30 minutes to several hours. For very tough burnt-on grime, leave it overnight.
This process allows the burnt food to absorb moisture, softening the residue and making it much easier to remove in subsequent steps.
Step 3: Scrape Away Loose Debris
Once the residue is softened, gently scrape away as much as you can:
- Use plastic or wooden utensils to avoid damaging the surface.
- Do not use metal scrapers on non-stick, ceramic, or glass surfaces.
- Work gently to prevent scratching.
When the surface is free of large debris, rinse with warm water.
Step 4: Apply a Cleaning Paste
If burnt-on deposits remain, it's time to break out a mild abrasive. A baking soda paste is both eco-friendly and safe for most surfaces.
DIY Baking Soda Paste for Burnt-on Residue
- Mix equal parts baking soda and water to form a thick paste.
- Apply the paste generously over the burnt areas.
- Let it sit for 15-30 minutes.
- Scrub gently with a soft sponge, non-abrasive pad, or designated brush.
Baking soda acts as a gentle abrasive and natural deodorizer, helping to disintegrate caked-on burnt residues while neutralizing odors.
Step 5: Use Vinegar or Specialized Cleaners
If residue persists, leverage the power of acid to dissolve tough burnt-on messes:
White Vinegar Method
- Pour white vinegar over the affected area (or fill the pan with vinegar to just cover the burnt section).
- Let it sit for 10-15 minutes. For stubborn stains, microwave or gently heat the vinegar in the pan for enhanced effect.
- Scrub with a non-scratch pad or brush.
- Rinse and check progress.
Commercial Burnt Residue Removers
If household options don't fully clean burnt-on food stains, look for oven cleaners, cooktop creams, or specialty products made for your appliance. Always follow safety instructions and rinse thoroughly.
Step 6: Repeat and Combine Methods if Needed
Extremely stubborn burnt-on spots or thick black crusts may need several passes using different methods. Don't be afraid to alternate between soaking, scrubbing, and applying cleaning pastes or commercial cleaners.
- Patience and repeated efforts can almost always restore surfaces.
- Keep checking to avoid damaging protective finishes.
Special Tips for Different Kitchen Surfaces
Stainless Steel Pans and Pots
- Boil with water and baking soda or vinegar: Fill the pan with water, add baking soda or vinegar, bring to a boil, then let cool before scrubbing.
- Avoid steel wool: Use non-scratch pads only.
Non-Stick Cookware
- No abrasives or harsh chemicals.
- Gentle sponges and baking soda paste work best.
- Be aware: Non-stick coatings can be ruined by vigorous scrubbing--if the residue won't come off, consider replacing the pan.
Glass Baking Dishes
- Baking soda paste and non-scratch pads are effective.
- Soak in vinegar for very persistent stains--heat if safe to do so.
Ceramic Stovetops and Induction Hobs
- Specialized cooktop cleaners are safest.
- Baking soda and vinegar (applied and cleaned with a soft cloth) work well.
Cast Iron Cookware
- No soap: Scrub with coarse kosher salt and a damp sponge.
- For heavy charring: Boil water in the pan to loosen, then scrape with a wooden or silicone spatula.
- Always re-season cast iron after deep cleaning.
Ovens and Oven Racks
- Remove racks and soak in hot soapy water or a bathtub covered with towels.
- Apply oven cleaner or a baking soda-vinegar paste to interiors.
- Let stand overnight before scrubbing.
Tools and Products for Cleaning Burnt-on Residue
- Non-abrasive scrubbers: Protect surfaces from scratching.
- Plastic or silicone spatulas: For safe scraping.
- Baking soda and vinegar: Classic, eco-friendly cleaning agents.
- Bar Keepers Friend or cooktop creams: For stubborn, safe residue removal on most surfaces.
- Specialty stainless steel and oven cleaners: For extreme cases.
- Protective gloves: Always recommended, especially when handling cleaning chemicals.
Preventing Burnt-on Messes in the Future
The best way to avoid spending time and energy on cleaning burnt-on residues is prevention:
- Use appropriate heat settings: Cooking at a lower temperature reduces the risk of food burning onto cookware or oven surfaces.
- Stir regularly and add sufficient oil or liquids: Prevents food from sticking and burning.
- Clean as you go: Don't let spills or drips bake on--wipe them while surfaces are still warm (but not hot to the touch).
- Use liners and baking sheets: Protect oven bottoms from drips and spills.
- Soak dishes early: The sooner you soak, the easier cleaning will be.
Common Mistakes to Avoid
- Using sharp or metallic objects that scratch or damage cookware coatings.
- Mixing cleaning chemicals without checking compatibility or safety.
- Applying harsh cleaners to delicate surfaces like non-stick or ceramic cooktops.
- Over-scrubbing: Excessive force can remove protective coatings as well as burnt-on food.
Frequently Asked Questions
Can I use bleach to clean burnt-on food stains?
It's not recommended. Bleach isn't effective for burnt-on food and can damage cookware finishes and react with some metals. Stick to baking soda, vinegar, or specialized cleaners.
What if the burnt-on residue won't come off no matter what?
Persistence is key. Multiple soaking and scrubbing sessions, especially with baking soda paste or commercial creams, usually work. For severely damaged non-stick pans, replacement may be necessary.
How to clean burnt-on milk stains?
Milk burns leave stubborn residue due to caramelized sugars. Soak in hot soapy water with a sprinkle of baking soda, then scrub gently with a non-abrasive pad.
Are there eco-friendly ways to clean burnt-on messes?
Absolutely. Baking soda, vinegar, and lemon juice are natural, non-toxic, and effective for most surfaces--making them perfect choices for green cleaning.
Conclusion: Restore Your Kitchen with Confidence
Dealing with stubborn burnt-on residues doesn't have to be an ordeal. With the right approach--soaking, scraping, using homemade cleaning pastes, and gentle persistence--you can reclaim your cookware and appliances from even the toughest messes. Always tailor your methods to the surface you're cleaning, never rush the process, and remember: a little prevention goes a long way.
By following this comprehensive step-by-step guide to removing burnt-on food stains, you'll keep your kitchen both sparkling clean and safe from the hazards of harsh chemicals or scratched surfaces.
Your cookware will thank you for the extra care--and so will your future meals!
